As you become comfortable with the basics of sea kayaking, you may want to keep progressing and unlock new experiences. Perhaps you want to paddle solo, play in the surf, or start exploring the open coast. As human powered craft, we are limited in top speed and endurance. Additional skills will keep things safe and fun in potentially challenging conditions. Again, I encourage you to take classes, especially for surf skills.
Using transits
A transit is some kind of landmark used for navigation. We use transits on long crossings to make sure we are paddling in a straight line. After all, a vast stretch of water isn’t marked by trails or painted lines. When wind and current are at play, using transits ensures that you are not drifting and paddling in a spiral toward your destination.
The idea is to line up the bow of your kayak with your destination and another object in the background. You will want to use fixed objects, like a hilltop, building, or tree. The further apart these objects are, the more apparent a course deviation will be.
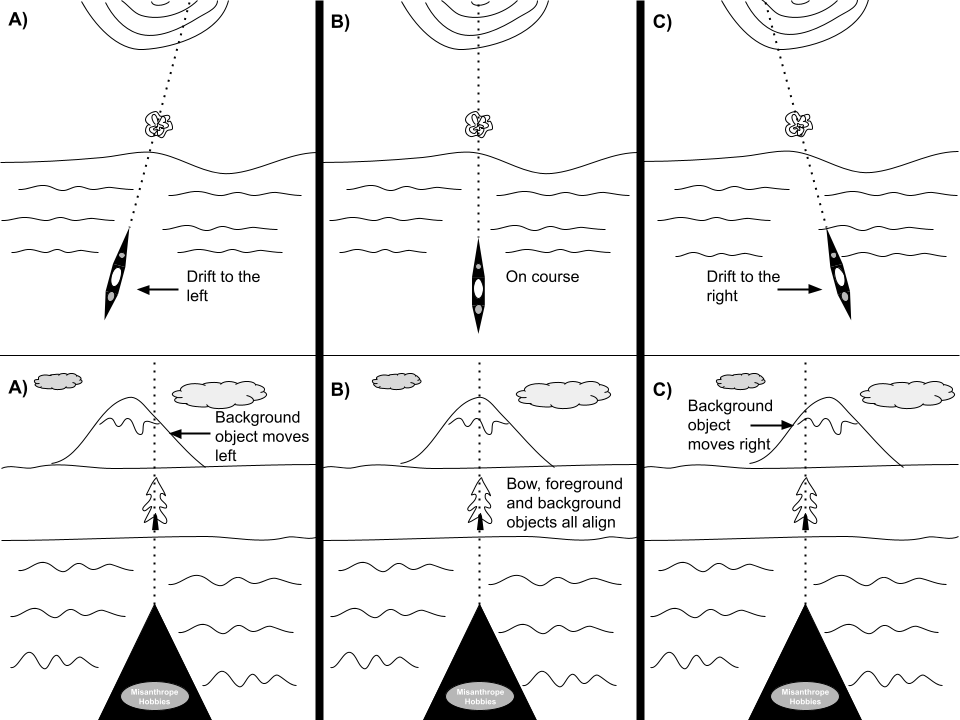
In the example above, let’s say your destination is marked by a tree. Directly behind the tree is the top of a hill. This is illustrated by the middle panel (B). As long as you keep your bow, the tree, and the hilltop aligned, you are paddling in a straight line. If you drift to the left of your destination (A), the background object will displace to the left. Correct by aiming to the right of your destination until the objects are back in alignment. Everything is mirrored if you are drifting to the right (C).
A corollary is the use of side transits. Instead of looking ahead, look directly to your right or left. If a foreground object and background object are staying aligned, then you are making zero headway (treadmilling). This can happen in a strong wind or current. If the background object is moving backward, then so are you.
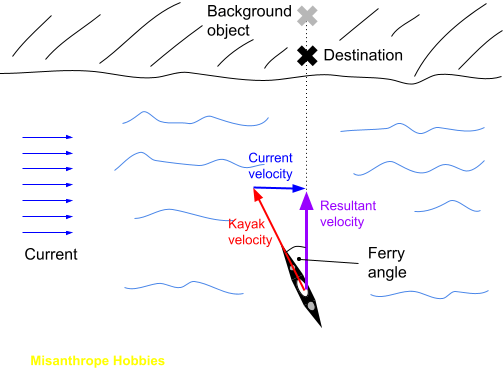
Transits are especially important for determining the correct ferry angle when crossing a current. To compensate for a cross current, turn your bow into the current. Use transits to verify you are paddling a straight line. If you start to drift, turn more or less into the current as needed. Staying in a straight line will help you conserve energy.
Edged turns
Edged turns take less effort, because you are using forward speed and the shape of the hull to turn, instead of a paddle stroke. It is my primary weapon against the winds of San Francisco Bay; I would be exhausted without it. Not all boats can make edged turns. The hull needs to have a chine, or a defined edge, below the waterline to grab the water when a lean is induced. A round hull cannot do this, so will require a rudder to steer and compensate for weather helm. If you want a kayak that can make edged turns, test different hulls before your purchase.
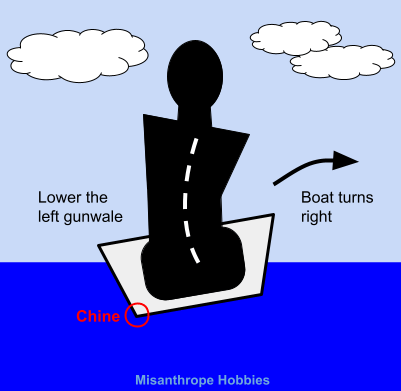
To execute an edged turn, you need to have a well fitted kayak, so contact is made with your knees and hips. In the image above, the left gunwale is lowered, the chine digs in, and the boat turns to the right. Lift your right hip and lower your right shoulder, so your spine forms a “C.” Notice the head is vertical, not cocked to one side. You are keeping your center of gravity over your hull to avoid capsize. I need to emphasize that you are not leaning your whole body, just using your core. Used in conjunction with a sweep stroke, an edged turn will be tight, much tighter than you can achieve with a rudder. Bear in mind you can keep paddling while edging your kayak.
An edged turn takes time to get comfortable with. It’s a lot better to practice with a correctly sized boat that you can paddle regularly. It’s a bit counter-intuitive (the boat turns away from the lean), requires coordination, and can feel tippy, but I guarantee you it is worth learning.
Surf zone skills
Once you get comfortable with kayaking, there is really nothing that can capsize you, except for breaking waves. If you live near the ocean or the Great Lakes, launching from a beach will require you to deal with surf. Standing waves caused by tidal or river currents have the same dynamics. After you learn to deal with breaking waves, your confidence and comfort level will grow exponentially. Always wear a helmet in the surf zone. In a kayak, you are stuck in a seated position, so it is much harder to avoid smacking into rocks. If you get dumped, keep the kayak between you and the beach. Otherwise, you risk getting hit by your own boat.
Launching entails getting in and attaching your spray skirt as fast as possible, pushing off the sand, then picking your way through the breakers without taking one directly in the chest. It’s fun. If you are going to get hit, tuck forward as much as possible to present the smallest frontal area. Coming back ashore is even more fun. A controlled landing is accomplished by following the back of a wave onto shore. This is easier said than done, because the surf zone is chaotic. You’ll need the right speed, and to keep the boat perpendicular to the waves. Otherwise, you’re surfing!
A bunch of things can happen when you are surfing. 1) You surf the wave all the way in. Nice! You will need to apply stern rudder strokes to fight the boat’s tendency to turn. 2) More often than not, you will get side surfed, which is where critical bracing skills come into play. 3) In rare conditions, pitchpoling becomes a danger. This is when your bow digs into the sand and the wave flips you over lengthwise. If you feel yourself pitchpoling, lean back as far as possible, or just roll over and exit the boat. Try anything to avoid landing on your face.
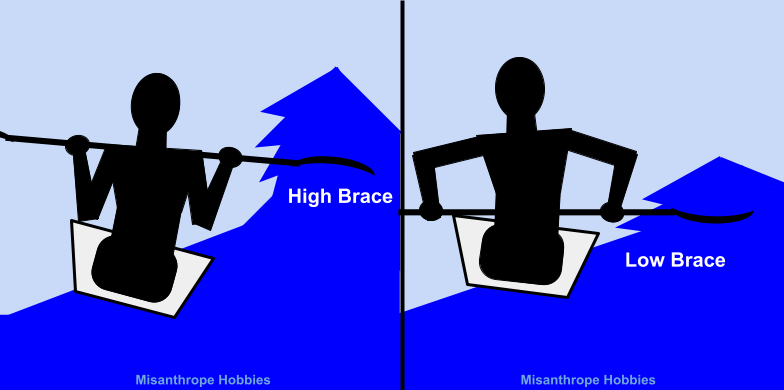
Learning how to brace is the biggest payoff for practicing in the surf zone, because it gives you confidence in rough water. Even a 1 foot breaking wave has enough energy to capsize you, so bracing will keep you upright. Once you start side surfing, there is a high brace and a low brace. In general, use a high brace for large waves, a low brace for smaller waves. In any case, keep your elbows as low as possible, because once your elbow gets near shoulder height, it’s easy to injure your shoulder. Notice the low brace places the elbows higher, which is why you don’t use it on big, powerful waves.
For a high brace, keep your elbows low by your side, and your hands at shoulder height. The power side of the blade should face down as you lean into the wave. The churning action of the wave will support you and your paddle. Be sure to straighten up once the wave has expended its energy, or you will capsize. For a low brace, keep your hands low and elbows at a 90 degree angle. Press down on the wave with the back of the paddle. Notice the lean of the hull in both cases. My instructor exhorted us to “moon the beach” as a reminder to present the high side towards shore.
Stay tuned for Part 2
