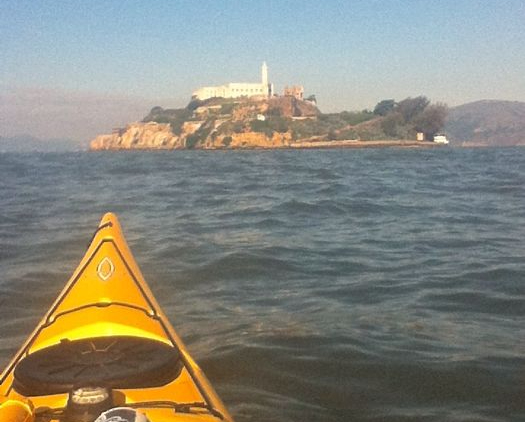
My home waters, San Francisco Bay, is a prime but challenging place to paddle. We have Alcatraz, the Gold Gate, Angel Island, and other destinations showcasing man made and natural beauty. However, you need to develop key skills as a paddler to safely appreciate these wonders. A paddler’s worst foes are wind and current, both of which can be abundant in the Bay. While the image of Alcatraz looks idyllic, conditions can change, and get serious in a hurry.
Take lessons
The best investment you can make in paddling is taking lessons. Yeah, I know, they are expensive, and maybe you won’t get a good instructor. As the saying goes, “ya pays ya money, and ya takes ya chances.” The bottom line is, you want to go out and have fun, but you should be competent. You want to avoid being the reason for a call to the Coast Guard. The necessary skills need to be learned and practiced with a good instructor. It may be a chore to find one, but the skills serve you for the rest of your life on the water. Most of my lessons were with Oakland-based California Canoe and Kayak, and to my good fortune, with ACA certified instructors. You’ll want to take at least a couple of lessons to achieve the minimum competency I will discuss in the rest of this post.
For the first few times, I suggest you paddle in groups or take guided tours. The level of risk increases when you paddle solo, so it helps to build experience in the safety of numbers.
Understanding wind and current
These are both things that can potentially exhaust you and ruin your day. San Francisco Bay’s tidal action moves enormous volumes of water, 4 times a day. All this water has to flow through tight spots like the Golden Gate and Raccoon Straight (near Angel Island), which generates strong currents. At the Golden Gate, currents can reach 6 knots, while the average kayaker can sustain 3 knots. If you were unfortunate to be caught in such a current, you would get swept out and have to wait until things died down in 2 to 4 hours. Even a 1 knot current can add 50% to your travel time. Understanding current predictions and knowing where strong currents occur is key. If you plan right, you can get the current to work for you, instead of against you.
In the summertime, it is common to develop 20 to 25 knot afternoon winds in the Bay. While that is awesome for kite and wind surfers, it is anathema to paddlers. I can barely make headway against a 20 knot breeze; it feels like being on a treadmill. Before we head out, we always check the marine forecast to decide if we want to paddle the open Bay or stay in protected waters. Nowadays we only venture out if the wind is 15 knots or less. Paddling early in the morning is sometimes the only way to get on the water.
Setup/ingress/egress
If you haven’t paddled before, learning how to set up foot pegs and deploy the skeg/rudder are important for comfortable and efficient paddling. Getting in and out of the kayak without becoming a swimmer is not intuitive, as we have seen in online videos. You should be able to launch on a beach or a dock of various heights. On a low dock, hold the paddle behind you and place one hand on the cockpit coaming, with the other on the dock to brace yourself. On a high dock, just place your feet inside the kayak and drop in; haul yourself up using a cleat meant for tying up boats. My favorite technique for a beach launch is to straddle the kayak, walk out until it floats up to my butt, drop in, draw in my legs, and paddle away.
Forward/back stroke
Almost everyone can pantomime the figure 8 motion of padding a kayak. The use of a double bladed paddle is intuitive, even more so now, due to the adoption of unfeathered paddles. It’s easy to get in a boat and start paddling, but an efficient and powerful forward stroke takes practice. Most people “arm paddle” at the start, using only their arms and shoulders to propel the kayak. In a short while, these relatively small muscle groups will tire out. Throw in a little wind and current, and your car can seem a long way away. Unless you are naturally gifted, it takes time to learn how to coordinate your entire body through the stroke. Your foot plants on its peg, connecting you with the hull. Your core rotates to provide power. Your arms firmly transmit power to the paddle as you push yourself through the water. Gradually this becomes second nature, and your speed and endurance increases. When conditions get adverse, it’s good to know you have a good forward stroke to get you home.
The reverse stroke (and all other strokes) also make use of core rotation. While it is not used often, having a strong reverse stroke will get you out of trouble. Perhaps you will avoid a collision, back out of a swift current, or avoid getting surfed into rocks.
Control strokes
These are the strokes you use to turn your boat and keep it pointed in the right direction. Primarily, they are the forward sweep and reverse sweep. Almost all boats will turn in the wind. A properly designed kayak will have a slight tendency to turn into the wind (weather helm). You should be able to overcome this tendency with paddle strokes, edged turns (an advanced skill), a skeg, or a rudder. A boat that wants to turn away from wind (lee helm) is to be avoided. You will expend all your energy trying to point where you wish to go, all the while being blown backward. A neutral boat is nice, but that means it is on the edge of lee helming.
Modern kayaks have contraptions to help you maintain a heading. A rudder is a common device that needs no explanation. On a kayak, it is operated by pushing on foot pegs that are connected by cables to the rudder. A skeg is more interesting. It does not turn; rather, you control how much it protrudes from your hull. When a boat wants to turn in the wind, it is because the air pushing on the hull above water is unbalanced with aquatic forces below the waterline. Extending a skeg balances these forces and keeps you on course. Personally, I avoid relying on mechanical devices because they can jam or break. It is better to develop good boat handling skills using your paddle and body. If my boat had a rudder or skeg, I would deploy it only in times of absolute need.
The draw stroke is used to pull your kayak sideways, up to a dock or another kayak. It is especially useful for pulling up to the bow of a capsized kayak in assisted rescues. There are two kinds, straight or sculling. It doesn’t matter which one you learn, as long as you have a means to go sideways.
Rescues
A kayak is a narrow hull not much wider than your hips. You should be proficient with rescue and re-entry skills in the event of a capsize. Whichever rescues you learn, you should regularly practice them in controlled conditions, either in a pool or calm water with the wind blowing onshore. More advanced practice can be done in open water once you are ready. Always wear a life jacket (PFD). “I know how to swim” is irrelevant. When you dump a kayak, you have to hang on to your paddle and boat. Having to swim is an unnecessary complication when you need to execute precise movements to rescue yourself.
With a sit-on-top kayak, it seems easy to right the kayak and climb back on. As it turns out, sit-on-tops float high in the water, and it takes considerable effort to pull yourself back on. If you have never tried it, I highly recommend practicing in a safe spot, so you know you can do it if you need to. My cousin, who is a strong guy, failed on his first attempts. Keep at it until you sort it out.
On a closed deck kayak, even a wet exit isn’t trivial. You need to practice staying calm and releasing the spray skirt before you can swim out. Once you do, you will be in fifty degree water (hopefully wearing a wet suit) with a boat half filled with water. The clock is ticking, because your strength will be sapped by frigid water and repeated attempts to re-enter your boat. What ensues, as one instructor put it, should be “businesslike.” There are assisted rescues, and self rescues. In my beginner classes, I learned the T-rescue (assisted) and the paddle float rescue (self). You should at least be proficient in one of each, so you can be responsible for yourself, and be ready to help someone else.
My goal is not to scare you. In my 27 years of paddling, I’ve only truly needed a rescue once. Still, I practice these skills. It’s not how often you need them, but the confidence you feel when you are proficient. You will be able to expand your paddling horizons with these skills in your bag. On a group outing, you will be an asset instead of a liability.
Conclusion
The water and its surroundings are a beautiful place to visit, but we need the skills to enjoy it, then return home to our loved ones. Think of lessons as insurance for yourself, and your expensive gear. Learning is part of the fun, so keep improving your skills. You will be rewarded with years of enjoyment on the water.
