“The best ______ is the one that you have with you,” the saying goes. With regard to astronomy, the best telescope is the one that you want to use, night in, night out. If your telescope is too large, heavy, or complicated to set up, you probably won’t use it. If your scope is too small, it may not reveal enough detail to keep you interested. Convenience also depends on your circumstances. Some folks build observatories in their back yard to house large scopes. Others live in apartments and have stairs to contend with. I have always been the latter. If I have a home with a yard and garage, you might hear me singing a different tune. I am also lazy, so if I am traveling to dark skies, I want something that is easy to set up, and doesn’t compete for space with other baggage.
Telescopes
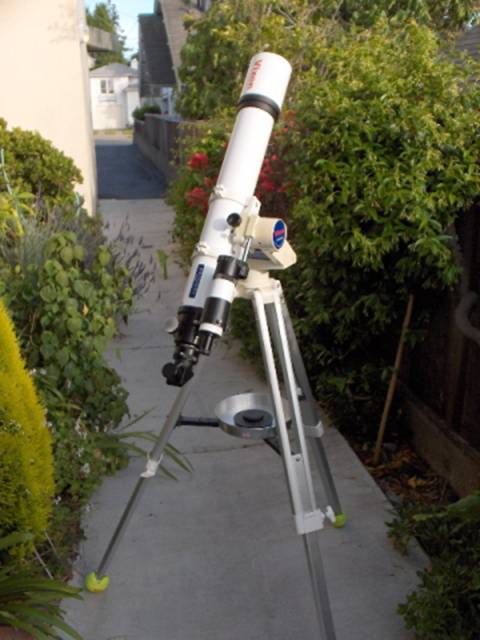
My primary telescope is a Vixen ED100sf, which is a 100 mm (3.9″) refractor. It has a 900 mm focal length, making it f/9. It is a doublet with ED glass, made in China by Synta Optical Technology. The optical tube weighs 7 lbs., which is very light. When I purchased this over 10 years ago, the same scope was sold by Orion Telescopes as the 100ED. It is still available as the Sky-Watcher Evostar 100 mm refractor. My refractor came as a package with a Vixen Porta-mount manual alt-azimuth mount, costing around $1,000. The same components would cost double today.
With this telescope (and its 4.5″ predecessor), I have been able to complete the Messier list, have excellent views of Jupiter, Mars, Saturn, and the Moon, split double stars, and sketched sun spots. Although a 4-inch scope might be considered small, it would take me a lifetime to see all the deep space objects visible with it. I think my next undertaking will be to sketch all 110 Messier objects, just to make sure I really “see” them.
My first telescope the Orion XT 4.5″ dobsonian reflector, which was a great scope in its own right. However, I was tempted by the unobstructed view of a refractor, so I sprung for an upgrade. That was back in my free-spending youth; these days I probably would have stuck with the reflector and done just as much observing. So, why spend 4x more on an ED refractor? Without vanes, bright objects like planets don’t show diffraction spikes. Not having a secondary obstruction helps the 3.9″ refractor punch above its weight in terms of contrast. A refractor has fewer parts and tends to be more robust and is likely to retain collimation. Lastly, a mirror will oxidize over time, losing reflectivity, although the effect takes a long time to be noticeable.
Chromatic aberration is inherent to refractors, which bend light using glass, like a prism. It is a challenge to focus all wavelengths, so optical designers compromise, resulting in an objectionable purple halo around bright objects. The use of ED glass is one of the ways to curb chromatic aberration, the other is to have a very long focal length, which makes for an ungainly telescope. However, ED glass comes at a high price. All things considered, I am very pleased with my Vixen ED100sf. It is reliable, easy to use, and gives awesome views. I would not hesitate to buy it again. Even after I croak, this telescope will be going strong.
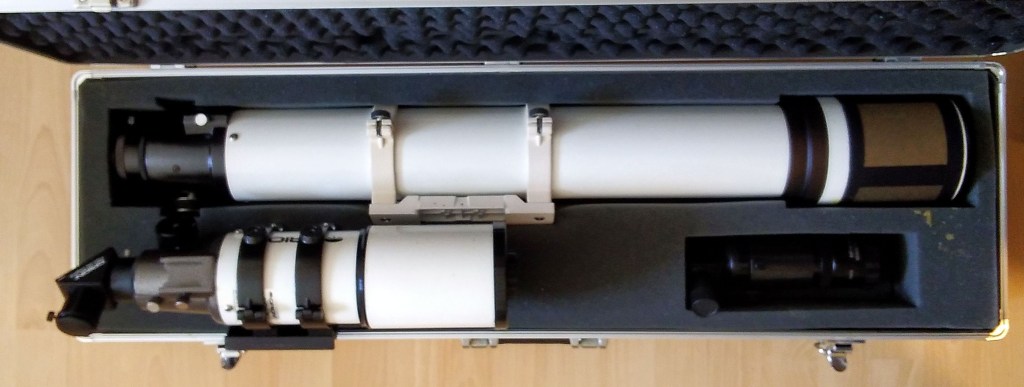
My second telescope is the sometimes maligned Orion ST80 (Short-tube 80) refractor. It has an 80 mm objective and a 400 mm focal length, with a focal ratio of f/5. This very short refractor is made of regular crown glass, therefore in no way controls chromatic aberration. In fact, it is the poster child of chromatic aberration. Regardless, I love it. It is lightweight (2.7 lbs.), portable, and gives great wide-field views of the milky way. Remember, chromatic aberration is mostly a factor on bright objects, like the moon and planets. If the purple irks you, you can use a green or yellow filter to tune it out. I am not bothered by it, and find the views in the ST80 acceptable up to 100x. It is great for quick observing sessions, and also doubles as my daytime spotting scope. It has a T-thread to attach a camera for use as a telephoto lens (I have never used this feature).
Mount
As previously mentioned, I use the Vixen Porta alt-azimuth mount, which has a dovetail that allows me to easily swap scopes. The Porta weighs around 10 lbs. and is easy to transport and set up. It is geared for slow-motion controls for precise centering of objects at high magnification. For rock-solid operation, you want your scope to be 1/3 the weight of the mount, so the ST80 is a perfect match. The ED100sf is 2/3 the weight of the mount, so vibrations can be a challenge. It takes a couple of seconds for the view to steady after touching the telescope. Forget about using the scope in high winds. Despite the trade-offs, the sub-20 pound total package is very portable and fun to use. If I am observing on a hard surface, I insert tennis balls over the feet of the tripod to dampen vibrations. Overall, I am very happy with the Vixen Porta-mount. It is out of production, but it appears to be a Porta-mount 2 available for a princely sum.
When using my ST80 as a spotting scope, I mount it on a heavy duty photography tripod.
Eyepieces
Most of my eyepieces are 1.25″ plossls. They are cost-effective, high quality, and offer a relatively wide field of view. I use two eyepieces and a 2x barlow for the bulk of my observing. For low power views in my 100 mm refractor , I use a 32 mm plossl, which gives 28x (56x with barlow). For medium power views, my 15 mm plossl gives 60x (120x with barlow). Both of these have fairly large eye lenses, so it doesn’t feel like you are looking through a straw. On most days, 120x is plenty of magnification, because air turbulence negates any benefits of going higher. With a 100 mm scope, 200x is about the limit on a very calm day, but it significantly dims the image. Beginners always want more magnification, but you will see just as much detail at lower magnifications with practice. About the only reason to push magnification is for resolving very tight double stars.
In terms of eye relief, the 32 mm and 15 mm plossls can be used with glasses. I take my glasses off over 100x, because astigmatism is not a factor when the exit pupil is small. If you look closely, you can see my 15 mm eyepiece has been modified. I filed off part of the rim so I can get my glasses closer to the lens, which is risky, but I managed not to scratch the glass.
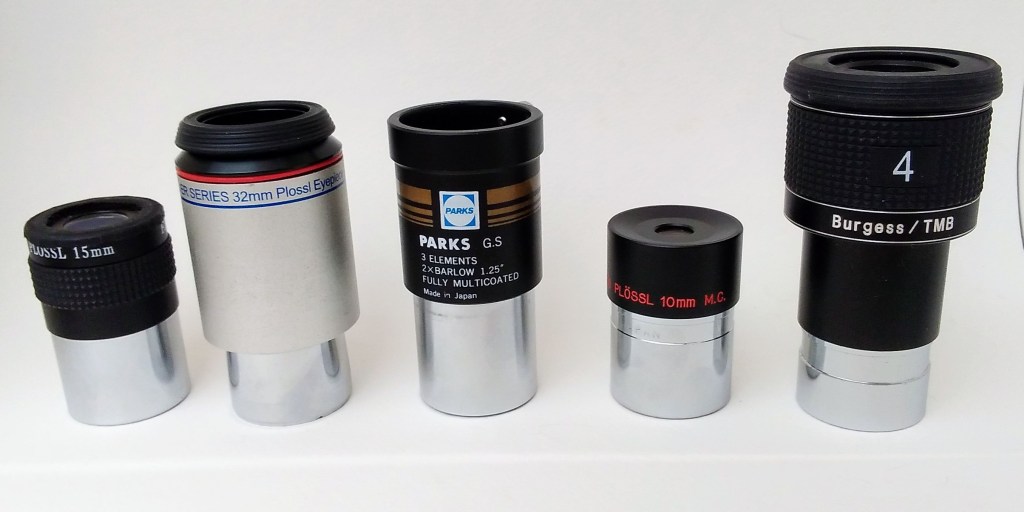
I also have a 10 mm plossl and a 4 mm “planetary” eyepiece with more optical elements. These tend to get used more with my ST80 when I want to push magnification, which is rare. When used with my ED100sf, the 4 mm eyepiece yields 225x, which is usually overkill.
Keep in mind that heavy 2″ (or fancy 1.25″) eyepieces can upset the balance of your scope, which will make it droop. You may need to add counterweights to work with heavy eyepieces.
Eyepiece filters
When I started astronomical observing, I thought I would get more use out of eyepiece filters. These screw onto the front of your eyepiece. I almost never use them now. I own #12 yellow, #56 green, and #82A light blue filters, which purportedly improve planetary viewing. I also own an adjustable (polarized) lunar filter, to dim the moon. It is very bright, but only as bright as something during the daytime, so it won’t harm your eyes. I have an Orion Ultrablock filter, which is intended to help with viewing nebulae under light polluted conditions. I wish it made a significant difference, but it has not helped enough for me to keep using it.
Finder scopes
On my ED100sf, I have a 9×50 Orion RACI (right angle, correct image) finder, which is a pleasure to use. This was an upgrade from the finder that came with my scope, which was 8×50 inverted image. Having a correct image finder is a little easier to use with a star atlas. If using an inverted image finder, just invert the map to match. My ST80 is paired with a 6×30 inverted image finder that works well enough for getting objects into view. I strongly favor optical finders over red dot finders, which are difficult to use for star hopping in light polluted skies.
Diagonals
Diagonals for astronomy bend light 90 degrees, and let you look through the eyepiece at a comfortable angle when your scope is pointed to the sky. One end attaches to the optical tube, while your eyepiece goes in the other. If you are hardcore, you can skip the diagonal and attach your eyepiece inline with the scope, which makes for odd viewing positions that might literally be a pain in the neck. I use a Meade prism diagonal that is of high quality. On my ST80, I use an Orion prism star diagonal. I have also had good luck with a dielectric diagonal from Orion.
When using my ST80 as a spotting scope, I use a 45 degree prism diagonal, which gives a better viewing angle for terrestrial objects.
Solar Filters
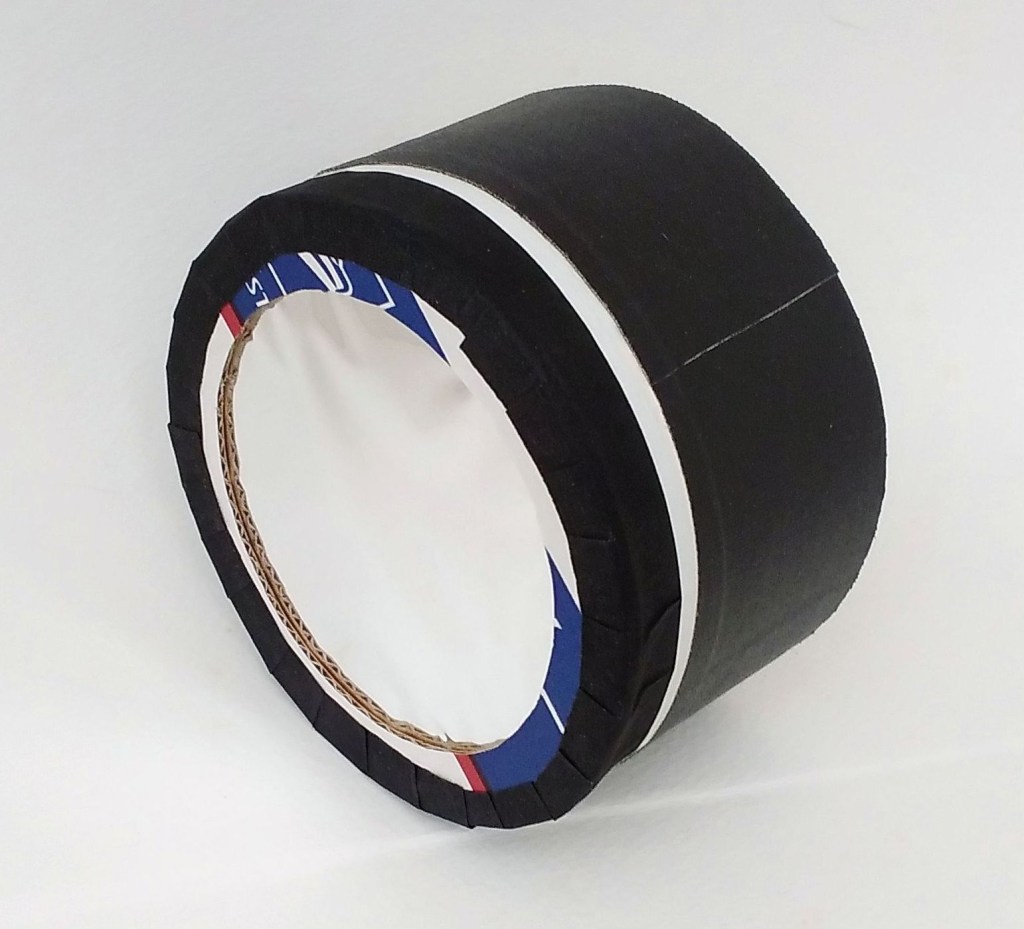
For white light solar observing, I use Baader Planetarium Astrosolar Safety Film, which is placed over your objective lens to cut out 99.999% of the light of the sun. This eliminates solar energy from your entire optical train, which is much preferred. The film is relatively inexpensive, and must be mounted to a cardboard holder that you make yourself. It is an easy project. If you have never seen sun spots before, you are in for a treat. Double and triple check that the filter is set up correctly before looking through your eyepiece. You can be permanently blinded viewing the sun through an unfiltered telescope!
Do not use your finder scope on the sun as it is not filtered! It is best to leave it off your scope for solar viewing. To aim your scope at the sun, look at the shadow of the optical tube. When it appears circular, you are aimed at the sun.
Another safe way to use your scope for observing sun spots is solar projection. Read about it here. If you use this method, be careful not to overheat your scope and eyepiece by taking frequent breaks.
Beware of solar filters that screw on the eyepiece! Your scope is collecting and focusing all that energy onto the filter. If it fails, your vision will be damaged.
Astronomy Chair
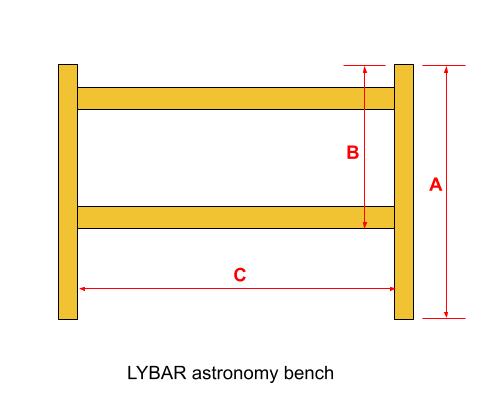
Depending on the object’s altitude, your eyepiece will be presented at different heights from the ground. The longer your telescope, the more true this is. Dedicated astronomy chairs with adjustable seat height are commercially available. Nowadays, I just sit on what is available, but in my more serious days, I made myself a LYBAR (Lift Your Butt And Rotate) bench. This is a genius design by Craig Stark. It can be made with an 8 foot length of lumber from the hardware store; just choose a width you are comfortable sitting on. The idea is to have different dimensions A, B, and C to offer the viewer three different seated heights. I found it to be very effective and portable.
Conclusion
There is no shortage of expensive gear to be had in astronomy. You can literally end up in the poorhouse trying to keep up with the latest and greatest, especially if you take up astrophotography. A lot of folks get caught up in acquiring gear instead of using it. With judicious selection of equipment and buying from the used market, you can enjoy a lifetime of observing for a modest expenditure. I did splurge on a 4″ ED refractor, but it is a scope I will keep for a lifetime. The buzz from buying something new is very transient, while a memorable experience lasts a lifetime. I will never forget seeing a shadow transit across Jupiter or the ghostly apparition of the Ring Nebula. So, go out and observe.
